Sunday, March 18, 2012

Papercraft Downloads for St. Patrick's Day Gifts

I found some really cute St. Patrick's Day ideas and free downloads from Pinterest to do for my son. One was a series of clues for him to go on a hunt for St. Patrick's Day gold, ending with a paper pot of gold that I printed, stapled together, and filled with candy. The other was a printable that I downloaded, printed, cut out with a punch, and stapled to the top of a bag of Rolos as the pot if gold.

The best part was that all this was free and already created! I also got ideas on other ways to design things from seeing these designs by other people.

Special Hello Kitty Flower Tags

I finally found a flower punch that I can use to layer with my smaller circle punch for favor tags. Making tags this way is much more time-consuming, however. I wouldn't make them for just anyone! My niece's 3rd birthday was the perfect occasion to try them out. She wanted Hello Kitty for her party, so I made a modified version of the ones I had made previously, but I changed the clip art, added a cuter font, and layered them onto red daisy shapes. I thought they were pretty adorable. Then again, anything Hello Kitty is adorable!

Getting Ready for the Baby Sprinkle

Lately, most of my creative time has been spent preparing for the "Baby Sprinkle" that I am hosting for my sister-in-law and niece to-be. I am literally doing a "sprinkle" theme, as in dessert sprinkles. I found lots of great inspiration on Pinterest. I am finding cute ways to incorporate rainy sprinkles into the theme. I found a cute invitation on Etsy, which I purchased for like $10. The seller emailed me the file, and I downloaded it and had them printed as photos at Walgreens.

I am now working on decorations for the party. I'm making a hanging cloud with paper sprinkles. I punched various colors with a small balloon punch. Then I trimmed the tips off to make them look more like raindrops. This was very time consuming. Now I am in the process of gluing them onto skinny silver string and tying them onto an embroidery hoop. When done, I will top it off with a cloud of pillow fill.

The other sprinkle project I am working on is tags for the favors. I had a hard time finding clip art, but finally found some on mygrafico.com. I am working on designing them, but am not quite happy with them yet.

I need to get cracking! I only have two weeks left!!

Hello Kitty Favor Tags

Today I whipped out these Hello Kitty tags to go with Hello Kitty cake pops made by Roxy's Sweet Treats. The tags are becoming more popular with her business. She wants me to come up with portfolio of things I've done and a price so that she can offer them on her website.

Saturday, February 18, 2012

Minnie Mouse Tags and Owls Part II

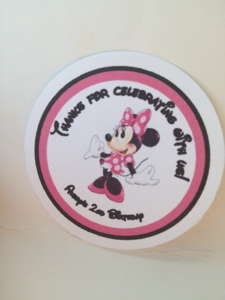
I made another round of favor tags for Roxy's Sweet Treats. These were Minnie Mouse Tags, so I downloaded a Disney-style font to use. I also made another blue owl tag for a different owl party. Owls are so trendy right now. I have fun making these tags now that I really have my system down.

My first Pinterest Fail

Okay, so you win some and you lose some. I had my first Pinterest fail when trying to make the Valentine project below that I saw on Pinterest via http://cleanandscentsible.blogspot.com/2011/01/valentine-hand-print-canvas.html

Mine did not turn out quite that way. Trying to get a good handprint from my 15 month old was darn near impossible. Then, the edges I tried to paint came our blotchy. Not to mention that the red handprints just look creepy.

It's all part of the learning process I guess. One canvas down the drain.

Saturday, February 4, 2012

A Fun Idea for My Children's Growth Chart

I am a very sentimental person who is totally focused on cherishing the years while my children are growing up. Although I could purchase a large variety of growth charts, I loved the traditional idea of marking children's growth on a door jamb (or other convenient location.) I like the idea of seeing both children side by side and comparing their height. However, I wanted this special documentation to be on something that I can take with me when we move one day. The problem was that I kept procrastinating, and my kids were getting taller by the minute. I began to think it was too late to start a growth chart and that I had missed my chance.

I was thinking about it one day recently, and it occurred to me that I had records of their height measurements from their doctor visits over the years. Some were even written in their baby books. Then inspiration struck. I had to have a long board or something sitting around the house that I could make a growth chart out of. Sure enough, I had an extra slat from our fake wood blinds, and in no time at all it was transformed into a fun keepsake. Here is how I did it:

Materials:
-Something tall to use as a growth chart, at least 5 feet tall. I used an extra slat of our wood blinds.
-Spray paint
-Pencil
-Measuring tape
-Ruler
-Sharpie marker
-Sharpie Paint Pens
-Ribbon
-Hot glue
-Your children's height measurements over the years (I had saved records from the pediatrician)

These are the materials I used.
First, I spray painted the entire board white. Then I gathered up my kids' height measurements from their baby books and doctor visit paperwork.With the measuring tape, I measured out the height of each of my children, from the day of their birth, 6 months, 1 year, 2 years, 3 years, and so on. I marked each increment with a pencil. I marked my son's height on left and my daughter's on the right.This makes it fun to compare their heights when they were the same age.


Then I drew a line over the pencil marks with Sharpie paint pens. I used blue for my son and pink for my daughter. These pens were purchased at Michael's. I used a ruler to make sure the line was straight. I labeled each measurement with my child's age and the date measured. Then, along the side, I wrote the measurement in inches with a black Sharpie.


I continued doing this until the growth chart was filled in as much as possible.
Then I hot glued two pieces of black ribbon onto the back and tied them into a bow in order to hang the chart.
At the bottom of the chart, I personalized it with my children's names and the quote "All Things Grow With Love" in decorative writing (using the paint pens.) There are tons of cute things that could be done at the bottom space. I was thinking decoupage, etc. In the end I decided that their names written in my own hand was a really nice personal touch that will someday be cherished.

This was my first project that I came up with completely on my own, so I am really excited that my creative inspirations are finally starting to bring out my own creativity.