Wednesday, April 4, 2012

Bunny Bait Recipe and Free Printable Bag Toppers

For my son's preschool Easter party I made a really tasty and cute treat called "Bunny Bait." Since I decided to package the Bunny Bait in Ziploc bags for practical reasons, I felt that I needed to jazz them up a bit. So I whipped up some quick Bunny Bait bag toppers to staple to the top of the bags. Voila! A cute, yummy, and easily transported treat for the Easter Party.

To make 24 bags of Bunny Bait, I tripled the recipe, and filled each bag about 1/3 full.

Here is the recipe I used:

-1 bag popcorn
-About 6 oz. pink vanilla candy melts
-About 1 cup pretzel sticks broken into small pieces
-1 bag Easter M&M's (regular kind)
-Sparkly Easter sprinkles

Pop the popcorn, being careful not to burn it. Place in a large bowl. Break the pretzels into pieces and Mix with popcorn. Dump the bag of M&M's into the bowl. Melt the candy melts in the microwave in 30 second intervals until melted. Pour the melted candy into the popcorn and mix all together until evenly coated, being careful to mix the items that have fallen to the bottom of the bowl. Spread mixture out on a large cookie sheet or wax paper. Add sprinkles as desired. Once coating is dry, place into bags as desired or serve in a large bowl.

This was another great idea that I found via Pinterest. The recipe I used came from this great blog, where you can find more information about the recipe and variations of it.

If you would like to use my Bunny Bait Ziploc Bag toppers, you are welcome to download them here: please note that they are fairly large as they are Ziploc size. Enjoy!

Sunday, April 1, 2012

"Sprinkled with Love" Baby Shower Sprinkle.

When it was time to plan the baby shower I was throwing for my sister-in-law in honor of her 2nd baby girl, I loved the idea of a "baby sprinkle." The idea of a sprinkle is that it's a smaller, more intimate baby shower with a "sprinkling" of gifts for the 2nd baby.

I searched high and low for ideas and materials for a baby sprinkle, but didn't find much that went with what I had in mind. I did find some inspiration on Pinterest (see my idea board here.)

So I decided to go with the idea of a rain cloud raining sprinkles, and this is what I came up with:

The Logo I designed for the party.
Sprinkle cupcakes and cupcake toppers
Centerpieces for the tables.
Party favors: Tags designed by me, heart salt shakers from Beaucoup.com
Dessert table decor: "Sprinkle Rain Clouds" on chandelier: Made by me. I used a paper punch to cut out the raindrops, glued them on silver string, and tied them to the chandelier. Then I stuffed pillow fill on the chandelier to make it look like a cloud.
Desserts: Heart Palmiers from Cost Plus, Biscotti, and marshmallows dipped in chocolate and sprinkled with rainbow sprinkles. Rainbow sprinkle cupcakes from Roxy's Sweet Treats.
Sprinkle decoration made by me. For this one, I tied the strings to an embroidery hoop.
I enlarged my logo into a sign for the front door.
Close up of sprinkle cupcakes and toppers.
Close up of dessert table chandelier decoration.
Close up of desserts. The marshmallow pops were a big hit!
Food table and chandelier decoration.
I arranged the sprinkle shaker favors onto a cake stand.

Monday, March 19, 2012

Making Progress

After a really inspirational talk with a wonderful friend who is supporting me in my process of living a more creative life, I decided to take a step back a bit and re-evaluate my blog. While I want to post my projects, the focus of my blog was meant to be on my creative process. After a few months now of creating, it's a good time to stop and look at how far I've come.

The biggest thing I have learned is that by opening myself up to my own possibilities, I have unconsciously opened up myself to so much more in life. I feel like so many good things are coming my way these days. My relationships with people are stronger than ever, I feel great about myself, and I am thinking of doing things that I never would have imagined doing a few months ago. No, it's not because I made a few little projects. It's that when you become open to possibilities about yourself, possibilities seem to come your way.

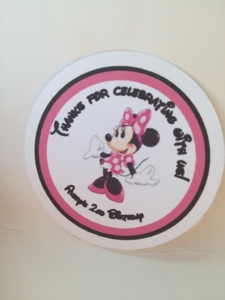
I feel like creatively I have come a long way as well. I am really proud of my Baby Sprinkle project that I've been working on for a while now. I really struggled with the computer design for the party circles as there was no available clip art that fit the theme I am using. I finally came up with something that was a combo of 2 clip arts that I made an image with. I love the design! This clip art search led me to begin thinking about learning how to design my own. I am interested in dabbling in graphic design software, but am really not sure which to use or where to start. I am starting to do a little research and talk to people to find out more about this.

Another development is that I am going to start selling my tags to customers of Roxy's Sweet Treat, just as as a way to help her out and test the waters as to how possible selling my work is. This makes me curious about perhaps posting my work on etsy or making my skills known to my social circles. I find this very scary. I have lots of questions about business licenses, taxes, and whether or not I can use other people's clip art. My other concern is that I am really enjoying making them , and I fear that adding a price tag to it and all the expectations that come with that will take all the joy out if it.

As for my latest projects, I'm really happy how the favor tags, cupcake toppers, and centerpiece party circles for the Baby Sprinkle came out. I opened an old design on my computer while making them, and I couldn't believe how far my skills have come since then. I have a much better understanding of the programs now.

Another great thing that has come out if this journey is a return to self-introspective writing in my life through my little blog. It's been decades since I kept a journal, and I forgot how enlightening it can be. I'm enjoying keeping it to myself so that I can focus on my growth instead of worrying about what everyone else thinks.

This is a good reminder that the creative process is what's important right now, and I need to stay focused on that. It's a little premature to be worrying about blog followers or starting a business! I need to take this one day at a time and just enjoy the ride.

On that note, here is the design for my Baby Sprinkle Party circles that I am so darn excited about!!

Sunday, March 18, 2012

Another Free Download for St. Patrick's Day and Making Cupcakes

I also downloaded and printed party circles that I found on Pinterest and used them as cupcake toppers. Again, they were already designed and free. All I had to do was punch them out and hot glue them to a lollipop stick.

My son also wanted to make the rainbow cupcakes from Family Fun magazine, discovered via Pinterest. I found them to be fairly time consuming and difficult to make. It was hard to figure out how much batter of each color to put in. I ended up putting too much at first and ended up with jumbo cupcakes. Some I did only one color, and dyed the frosting green to make more traditional St. Patty's cupcakes. I am, however, getting better at frosting them with a frosting bag.

Papercraft Downloads for St. Patrick's Day Gifts

I found some really cute St. Patrick's Day ideas and free downloads from Pinterest to do for my son. One was a series of clues for him to go on a hunt for St. Patrick's Day gold, ending with a paper pot of gold that I printed, stapled together, and filled with candy. The other was a printable that I downloaded, printed, cut out with a punch, and stapled to the top of a bag of Rolos as the pot if gold.

The best part was that all this was free and already created! I also got ideas on other ways to design things from seeing these designs by other people.

Special Hello Kitty Flower Tags

I finally found a flower punch that I can use to layer with my smaller circle punch for favor tags. Making tags this way is much more time-consuming, however. I wouldn't make them for just anyone! My niece's 3rd birthday was the perfect occasion to try them out. She wanted Hello Kitty for her party, so I made a modified version of the ones I had made previously, but I changed the clip art, added a cuter font, and layered them onto red daisy shapes. I thought they were pretty adorable. Then again, anything Hello Kitty is adorable!

Getting Ready for the Baby Sprinkle

Lately, most of my creative time has been spent preparing for the "Baby Sprinkle" that I am hosting for my sister-in-law and niece to-be. I am literally doing a "sprinkle" theme, as in dessert sprinkles. I found lots of great inspiration on Pinterest. I am finding cute ways to incorporate rainy sprinkles into the theme. I found a cute invitation on Etsy, which I purchased for like $10. The seller emailed me the file, and I downloaded it and had them printed as photos at Walgreens.

I am now working on decorations for the party. I'm making a hanging cloud with paper sprinkles. I punched various colors with a small balloon punch. Then I trimmed the tips off to make them look more like raindrops. This was very time consuming. Now I am in the process of gluing them onto skinny silver string and tying them onto an embroidery hoop. When done, I will top it off with a cloud of pillow fill.

The other sprinkle project I am working on is tags for the favors. I had a hard time finding clip art, but finally found some on mygrafico.com. I am working on designing them, but am not quite happy with them yet.

I need to get cracking! I only have two weeks left!!

Hello Kitty Favor Tags

Today I whipped out these Hello Kitty tags to go with Hello Kitty cake pops made by Roxy's Sweet Treats. The tags are becoming more popular with her business. She wants me to come up with portfolio of things I've done and a price so that she can offer them on her website.

Saturday, February 18, 2012

Minnie Mouse Tags and Owls Part II

I made another round of favor tags for Roxy's Sweet Treats. These were Minnie Mouse Tags, so I downloaded a Disney-style font to use. I also made another blue owl tag for a different owl party. Owls are so trendy right now. I have fun making these tags now that I really have my system down.

My first Pinterest Fail

Okay, so you win some and you lose some. I had my first Pinterest fail when trying to make the Valentine project below that I saw on Pinterest via http://cleanandscentsible.blogspot.com/2011/01/valentine-hand-print-canvas.html

Mine did not turn out quite that way. Trying to get a good handprint from my 15 month old was darn near impossible. Then, the edges I tried to paint came our blotchy. Not to mention that the red handprints just look creepy.

It's all part of the learning process I guess. One canvas down the drain.

Saturday, February 4, 2012

A Fun Idea for My Children's Growth Chart

I am a very sentimental person who is totally focused on cherishing the years while my children are growing up. Although I could purchase a large variety of growth charts, I loved the traditional idea of marking children's growth on a door jamb (or other convenient location.) I like the idea of seeing both children side by side and comparing their height. However, I wanted this special documentation to be on something that I can take with me when we move one day. The problem was that I kept procrastinating, and my kids were getting taller by the minute. I began to think it was too late to start a growth chart and that I had missed my chance.

I was thinking about it one day recently, and it occurred to me that I had records of their height measurements from their doctor visits over the years. Some were even written in their baby books. Then inspiration struck. I had to have a long board or something sitting around the house that I could make a growth chart out of. Sure enough, I had an extra slat from our fake wood blinds, and in no time at all it was transformed into a fun keepsake. Here is how I did it:

Materials:
-Something tall to use as a growth chart, at least 5 feet tall. I used an extra slat of our wood blinds.
-Spray paint
-Pencil
-Measuring tape
-Ruler
-Sharpie marker
-Sharpie Paint Pens
-Ribbon
-Hot glue
-Your children's height measurements over the years (I had saved records from the pediatrician)

These are the materials I used.
First, I spray painted the entire board white. Then I gathered up my kids' height measurements from their baby books and doctor visit paperwork.With the measuring tape, I measured out the height of each of my children, from the day of their birth, 6 months, 1 year, 2 years, 3 years, and so on. I marked each increment with a pencil. I marked my son's height on left and my daughter's on the right.This makes it fun to compare their heights when they were the same age.


Then I drew a line over the pencil marks with Sharpie paint pens. I used blue for my son and pink for my daughter. These pens were purchased at Michael's. I used a ruler to make sure the line was straight. I labeled each measurement with my child's age and the date measured. Then, along the side, I wrote the measurement in inches with a black Sharpie.


I continued doing this until the growth chart was filled in as much as possible.
Then I hot glued two pieces of black ribbon onto the back and tied them into a bow in order to hang the chart.
At the bottom of the chart, I personalized it with my children's names and the quote "All Things Grow With Love" in decorative writing (using the paint pens.) There are tons of cute things that could be done at the bottom space. I was thinking decoupage, etc. In the end I decided that their names written in my own hand was a really nice personal touch that will someday be cherished.

This was my first project that I came up with completely on my own, so I am really excited that my creative inspirations are finally starting to bring out my own creativity.

Wednesday, January 25, 2012

Awesome "Boy Valentines."

Another fun project my son and I did together were these awesome "boy valentines" that I found via Pinterest from meckmom.com,  http://www.meckmom.com/2011/02/04/free-star-wars-valentine-printable/. She included the downloads for free, which was really great. Follow the link to her website for the download and for detailed directions.

 First we purchased and gathered up all the supplies. After that, All we did was print them, cut them out, cut out the circles with a punch, and glue them onto the Reese's. Then we placed them into small bags, stapled the tops closed, and stapled the tags on top. Voila! My son LOVES them.

It dawned on me that this idea could be used for lots of things besides Valentines. I am now also pretty good with making this type of thing on the computer, so I can design my own. I could use them as class gifts, party favors, etc. I am definitely going to run with this idea.

Owl tags

I made cake pop tags for Roxy's Sweet Treats again. I am getting really fast at these. Barring technical difficulties, I can whip them up in like 30 minutes, tops. It kind of makes me curious about people who sell these. How much do they make on these? Making them drains print cartridges and paper pretty quickly. If you buy graphics, you have to pay an extra $20 per graphic if you are going to sell them commercially. I wonder if they actually make a profit?

Sunday, January 22, 2012

Family Picture Art

I saw a really cute idea for a family portrait on a blog that I came across via Pinterest, that did a similar idea to the project below. This afternoon, my son and I did this project together in just a few minutes. We love to do projects together, and it will be something that I will cherish forever.

First, I had my son carefully draw a family portrait onto a square canvas, simply using a Sharpie marker.( I used a few items that were laying on the kitchen table to rope off the top portion of the canvas!)


Then I used my Cricut machine to cut out the letters. This, frankly was the hardest part of the project. I have never had much success with cutting letters with the Cricut. The letters always rip and/or the Cricut makes random cuts across the letters. It may have been just as easy to print them on Word and cut them out by hand! But I have a Cricut cartridge "Sophisticated," that had the phrase "Family is Forever" as a premade option, and since I always say that particular phrase to my son, I decided to use it. It would also be cute to have the family last name at the top, or any other phrase you can think of.


Then I used a repositionable glue stick to glue the letters on. I didn't want to use my usual spray adhesive because I wanted to be able to reposition the letters if needed. Even so, they weren't centered perfectly. I should have used a ruler in retrospect. This is the first time I've tried gluing lettering, so now I will know that tip for next time!


After gluing the letters, I painted over the entire canvas, including the sides, with Anita's Semi-Gloss Varnish. I'm sure that Modpodge would have worked also.

Once it's dry, I will add it to our hallway gallery of black and white photos. I'm sure that it will make a wonderful addition to our family memory wall.

Class Photo Flower Arrangement for Open House


I was looking for ideas to jazz up our classroom for Open House, and I came across this adorable idea for a photo bouquet on Pinterest. Using a few materials from the Dollar Store and my own paper and supplies, I made it in just a couple hours. It was pretty straightforward, but basically I printed the photos on photo paper. I used a template to print them that was on my computer. I think it was 4 4X6 photos per page. Then I cut out the faces with my circle punch, I think it's 2". I then cut a variety of scallop circles with my 3" die cut on cardstock. I hot glued a skinny candy stick on the back. I placed 2 pieces of florist foam inside the plastic flowerpot (both from Dollar Store.) Then I poked the flowers in, which was the hardest part as I had 24 of them. A wider, more narrow pot may have worked better in terms of being able to see all the faces. Anyway, then I filled in the top of the flowerpot with moss from the dollar store, added my little message on the pot using a Sharpie, and Voila! Later this year, I think we might reuse the flower as some sort of Mother's Day gift or use it in a project.

Sunday, January 15, 2012

Creating a Cute Blog & Mobile Blogging

Ooh, I figured out how to post from my iPhone!!!  This will take me WAY less time to update my blog. Maybe now I will have more time to update it. Perhaps now when I update my blog I won't have to stay up until 11pm, neglecting housework, much needed sleep, and my diet (because I HAD to eat some candy someone gave us for Christmas while I sat in front of the computer.)

Next up, After several hours I FINALLY figured out how to add a cute header and background to my blog. I found it on shabbyblogs.com. I even figured out how to edit the header that I downloaded in powerpoint and add text to it, which I had no idea you could do before today. It took me forever to figure out how to tweak a few more things, such as getting rid of a big space below my header, but I finally did it. I feel like I have a better handle on how to make my blogging easier and more fun, and most of all I'm excited because it looks SUPER cute! It's interesting because I'm finding that I enjoy making creative things on the computer, and that really didn't occur to me before. Maybe it's because I'm not really artistic per se, but a computer can do it for me. Very interesting...

Toy Story and Butterfly Cake Pop Tags, January 14

My creative project of the week was cake pops tags that I made for my sister-in-law, Roxanne's baking business (see Roxy's Sweet Treats on Facebook.) I tried a new program this time, Microsoft Publisher, and I had studied up and played around with it for a few weeks in advance. I learned some new techniques and tips to make it easier, and also perfected them a bit with learning how to center them better. Here they are!

Blogging: A major project

Since I am new to the world of blogging, the act of creating my blog is a very creative outlet for me as well. I enjoy writing and journaling, so that part is easy. However, trying to figure out how to format my blog, use blogger, etc. is totally overwhelming me!!! I can't figure out anything right now, but at least I got something slapped together for now. Trying to figure out how to blog is taking away my crafting time! This blogging thing is going to be tough to do every week, unless I can find a quicker way of doing it, especially downloading pictures.  I have to stay up after my hub goes to bed because I know he will make snarky comments about my computer usage otherwise. WHO HAS TIME FOR THIS?! O.K.. Frustration attack over. I'm thinking that this must just be a learning curve issue. I will get much faster at this. I think I can, I think I can.

This only reinforces my point that I am using this to keep track of my own creative process and am not out to impress anyone with my fancy blog!!! Perhaps someday I will be brave enough to let friends and family know about it, but for now, mums the word.

La Befana Banner

My second project of the New Year was born out of a need for something that I would never find in a store. My family is Italian-American, so each year we celebrate "La Epifania," or the Feast of the Epiphany (January 6.) The tradition in Italy is for "La Befana," best described as a Christmas witch, to deliver presents to children on the eve of January 5. Legend has it that she is searching for the Christ Child, and so she gives every child a present, hoping that one will be the Christ Child. My family has continued this tradition, as I have with my own children, even though my children are the 4th generation born in America. I love how traditions such as these can keep our cultures alive for our own children.


So, this year my son asked if we had any "Befana" decorations. Besides the special stockings I had custom made from a woman I found online, there are really no other decorations available here in the U.S. So I ordered a Befana papercraft witch on etsy, and then I used it to embellish my own banner that I made with my Cricut machine. I really did not put much planning into this, I didn't even go out and buy ribbon or paper. I just used what I had and pumped out the whole thing in an hour and a half, tops. That was record time for using my Cricut for a banner! One thing I discovered was to keep track of my projects in a notebook so I know what size to use on my machine and other details like that. This way I don't have to go through the trial and error of using the Cricut each time I want to make a banner. By the way, "Buona Epifania" means "Happy Epiphany."